Create or edit a phone menu
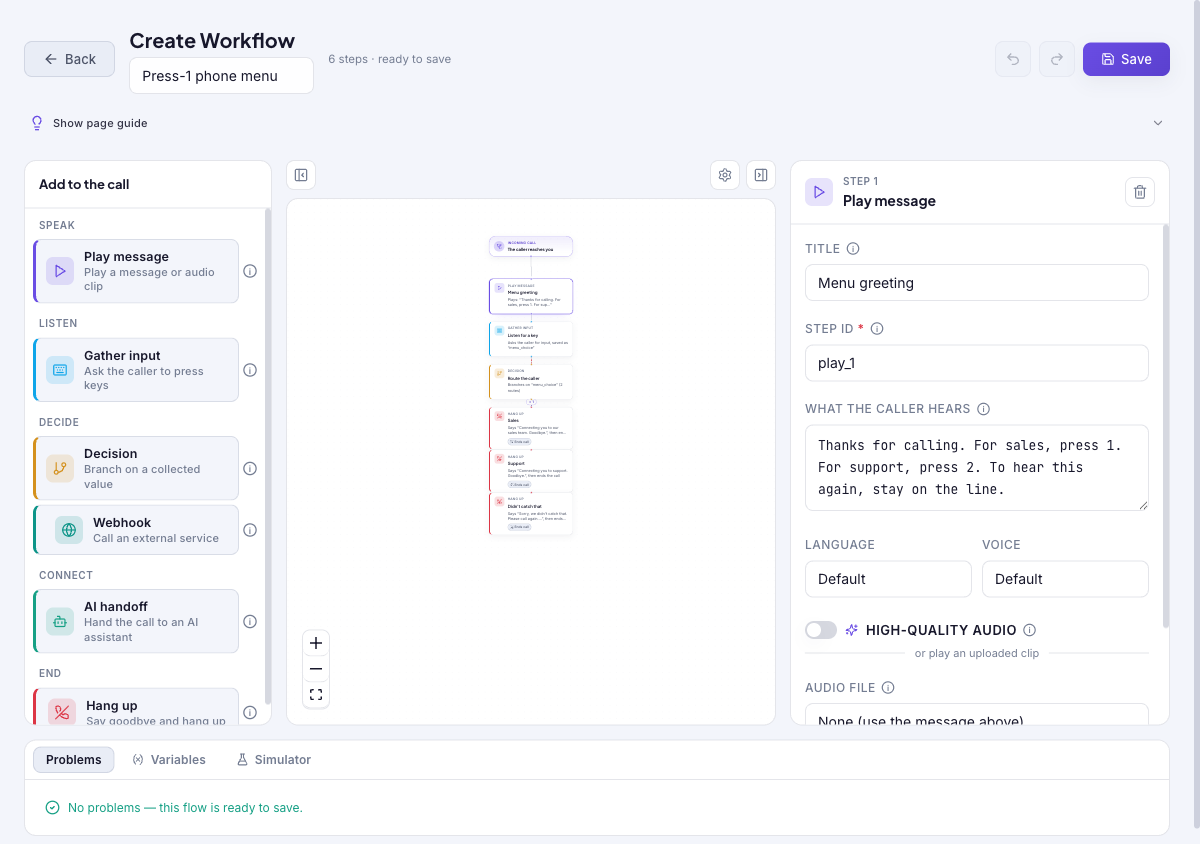
Build a new IVR workflow from a template or a blank canvas, or edit an existing one, in the same visual builder: a step palette on the left, the call-flow canvas in the middle, the selected step’s settings on the right, and a dock for problems, variables, and a no-cost simulator.
Audience: IVR builders · Page address: /app/ivr-workflows/new · Your admin may need to enable this feature
Common tasks
- Start from a template or blank canvas
- Add and connect call steps
- Configure each step’s settings and routes
- Simulate, resolve problems, and save
How to use this page
1. Choose a starting point
Begin with a structure that matches the call flow, whether the workflow is new or an edit.
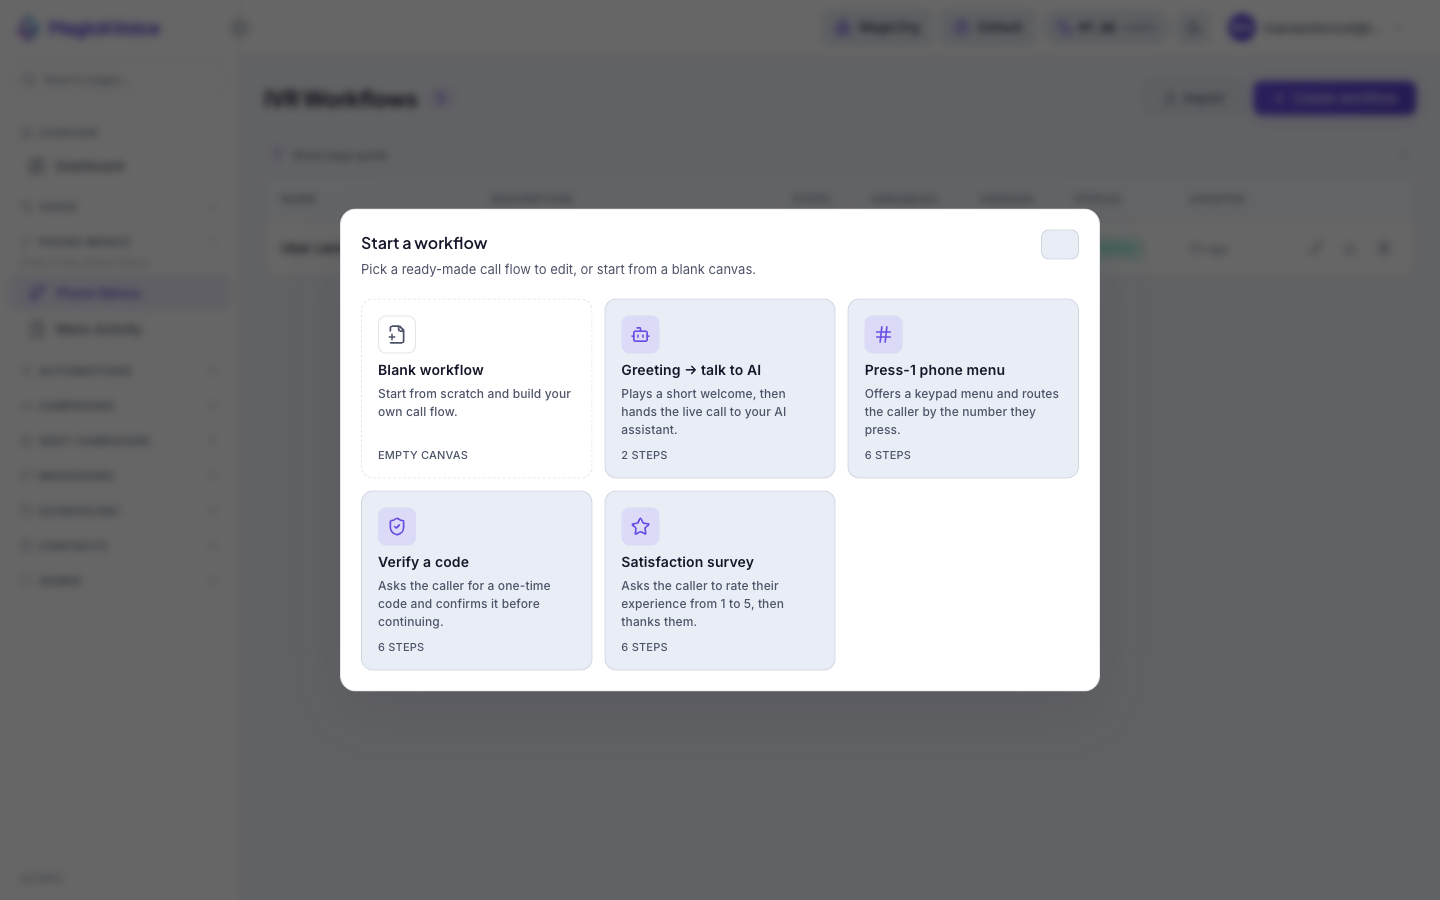
- For a new workflow, select Create workflow from Phone Menus, then pick a template — Blank workflow, Greeting → talk to AI, Press-1 phone menu, Verify a code, or Satisfaction survey. Each template card shows how many steps it starts with.
- To change an existing workflow, select Edit on its row. The builder opens on the same canvas; a header shows the workflow name, the step count, and whether the flow is ready to save.
- Give the workflow a clear name in the name field at the top so it is easy to find later.
2. Build the caller’s journey
Lay out the steps a caller moves through, from greeting to a final destination.
- From the Add to the call palette, add steps: Play message (speak text-to-speech or an uploaded clip), Gather input (ask the caller to press keys and save the result to a variable), Decision (branch on a collected value), Webhook (call an external service mid-call), AI handoff (connect the live caller to an AI assistant — a terminal step), and Hang up (end the call, optionally with a final message).
- Select any step on the canvas to edit it in the right-hand inspector. For a Play message step you set the Title, the required Step ID (used to wire routes), what the caller hears, and the Language and Voice; High-quality audio pre-generates natural-sounding speech instead of the phone network’s robotic text-to-speech.
- Routes read in caller language on the canvas — “if the caller presses 1”, “no input”, “otherwise” — so the branches show exactly how a caller reaches each step.
- Use Undo and Redo while you arrange steps. Only blocking problems stop you saving; reachability and variable hints are advisory.
3. Step type — Play message (Speak)
Speak something to the caller — a greeting or read-out information — then continue down the call line. Plays text-to-speech or an uploaded audio clip.
- What the caller hears: the text spoken via text-to-speech. Use {{variable}} to insert values collected earlier in the call.
- Language and Voice: the language and voice used to speak the message; leave on Default to inherit the workflow’s settings.
- High-quality audio: pre-generates natural-sounding speech through the provider instead of the phone network’s robotic text-to-speech, and falls back to standard audio if it cannot be generated.
- Audio file: choose an uploaded clip to play instead of the text — upload clips under Audio Files first. Advanced options add a Loop count to repeat the message before continuing (defaults to once).
- Use it to open the call, read back information, or bridge between steps.
4. Step type — Gather input (Listen)
Ask the caller to press keys and save what they enter into a variable you can branch on later — a menu choice, an OTP, or any keypad input.
- What the caller hears: the prompt played before input, for example “Press 1 for sales, or 2 for support.” Supports {{variable}} personalization.
- Save the answer as: the required variable name the keypad input is stored under (for example menu_choice) so later steps can test it or pass it to the AI.
- Digits: how many keypad digits to collect (1–20). Timeout: seconds to wait for input before treating it as no input (1–120). Retries: how many times to re-prompt after no input (0–10).
- If the caller gives no input: where to send the caller after they run out of retries; leave blank to continue down the call line.
- Language, Voice, and High-quality audio behave as they do for Play message. Use it whenever the flow needs a decision or data from the caller.
5. Step type — Decision (Decide)
Route the caller differently based on a collected value — “if they pressed 1, do this; otherwise, do that.” Adds no audio; it only chooses a path.
- Decide based on: the collected variable to test (for example menu_choice). Every rule below compares this value.
- Rules: each rule is an operator — Equals, Not equals, In (list), Greater than, or Less than — a value, and a destination step. Each rule peels off the canvas as a labeled detour, and the first matching rule wins.
- Otherwise (no rule matched): the catch-all destination when no rule matches; leave blank to continue down the call line to the next step.
- Use Add rule to add more branches. Use it right after a Gather input step to send each keypad choice to the right place.
6. Step type — Webhook (Decide)
Call an external service mid-call to fetch or send data — for example look up an account — and optionally save the response and reroute on failure.
- Endpoint URL (required) and Method (POST or GET): the service to call; use {{variable}} in the URL to pass collected values.
- If the request fails: where to send the caller if the service errors or times out.
- Advanced — Save response as: store the response (or a field of it) under a name for later steps. Request body: a JSON template sent with the request, using {{variable}} placeholders.
- Advanced — Timeout (500–30000 ms) and Retries (0–5) control how long to wait and how many times to retry. Wait message plays to the caller while the request runs.
- Use it to personalize the flow with live data, such as branching on an account status returned by your system.
7. Step type — AI handoff (Connect)
End the IVR and connect the live caller to an AI assistant on the same line. A terminal step — nothing runs after it — and variables collected earlier flow into the AI prompt automatically.
- AI prompt template (required): the call script the AI agent uses once it takes over; choose one of your saved Call Scripts.
- AI’s opening line: the first thing the AI says when it takes over, with {{variable}} personalization.
- Prompt variables: map collected values into the prompt — the builder offers quick chips such as {{menu_choice}} for the values already gathered.
- Advanced — AI quality sets an optional quality tier (Bronze through Platinum, or the server default) and Language sets the language the AI converses in.
- Use it to let callers self-serve through the menu and then talk to the AI for anything the menu cannot handle.
8. Step type — Hang up (End)
End the call cleanly, optionally after a final message. A terminal step — the call ends here.
- Final message: an optional line played to the caller right before the call ends, for example “Thanks for calling. Goodbye!”
- Language and Voice control how that final message is spoken.
- Use it to close every branch of the flow so callers always reach a defined ending rather than dropping off unexpectedly.
9. Simulate, resolve problems, and save
Confirm the flow routes correctly before it handles live callers.
- Open the Problems tab in the dock. Items there are clickable and jump straight to the step that needs attention — for example “Webhook step needs a valid URL”, “prompt_template_id is required”, or a step that “can’t be reached from the start of the flow”. The flow is ready to save when it reports no blocking problems.
- Use the Variables tab to review the values the flow collects and references, such as menu_choice.
- Open the Simulator, set the sample call details (for example a phone value and a menu_choice), and select Run call to walk the flow step by step. Nothing is dialed and no credits are spent.
- Select Save once the flow is correct. For a significant edit to a live workflow, simulate the revised routing first, since an edit changes the flow that future calls will follow.
Tips and troubleshooting
- Use short labels for IVR steps so the canvas remains readable as the menu grows.
- Test no-input and invalid-input paths; they are the most common places callers get stuck.
- New and edit use the same builder and the same steps; an edit changes the workflow that live calls follow, so treat it as affecting callers already routed through it.
- Give every step a clear Title and a stable Step ID — routes wire to the Step ID, so renaming or removing a step can break the branches that point to it.
- Test the no-input and invalid-input paths in the Simulator; they are the most common places callers get stuck.